Kotlin’s idiomatic approach to Null Safety
Computer scientist Tony Hoare Said:
I call it my billion-dollar mistake. It was the invention of the null reference in 1965
The nullable objects introduces a fundamental problem with type system. For e.g If you declare a object as String, it doesn’t guarantee that the value is real String or null.
We normally skip null checks based on our assumptions in control flow of code. But when we are wrong, the code crashes with Null Pointer Exception. Java 8 introduced Optionals to deal with Nullable objects. But it has some flaws
Why Java Optionals is not a greatway to handle nulls?
Wrapping and unwrapping objects into Optional class makes code verbose. Also since it was introduced only in JDK8, you still need to deal with null values returned from older JDK methods.
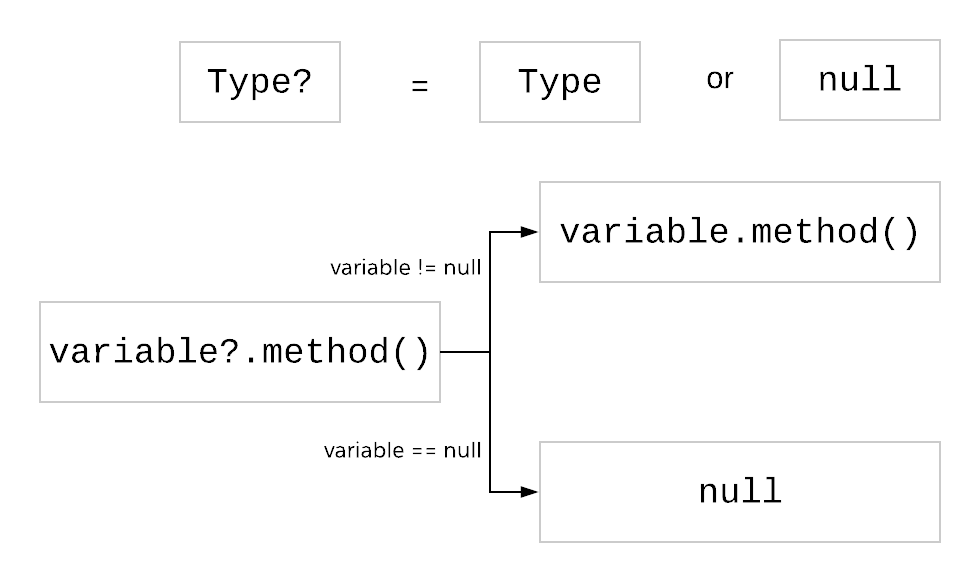
How Kotlin handles null safety?
If you are designing a new language, How will you handle null references? Won’t you add a explicit type definitions for nullables. That’s what Kotlin does.
By default all objects are non-nullable, So you can’t store nulls in them. But if a variable can hold null values, you have to explicitly append ? to indicate it’s nullable. Then, Kotlin forces you to call methods on them using safe call operator ?.
var name = "Kotlin"
var nameLength = name.length // Works
name = null // Compilation Error : Null can not be a value of a non-null type String

var nullableName : String? = null

// Compilation Error : Only safe (?.) or non-null asserted (!!.)
// calls are allowed on a nullable receiver of type String?
var nameLength = nullableName.length

nameLength = nullableName?.length ?: 0
How to replace Java Optionals in Kotlin?
Anything you can do with Java Optionals can be done idiomatic way in Kotlin. For e.g:
- To do transformation Optional.map(...) can be replaced with safe call operation ?.
- To filter non nulls from a collection, we can use filterNonNull() method from Collection library.
- To execute a piece of code only if value is non-null , You can use letfunction in Kotlin. let function is useful to execute a block of code when the value is non-null.
- To assign a default value in case of null, you can use elvis ?: operator.
- Elvis ?: operator can also be used to throw exception in case of null
The below code shows Java Optionals and their equivalents in Kotlin.
 //Creating Optionals
Optional<String> name = Optional.of("Hello");

//Transforming
name.map(String::toUpperCase);

//Filter non empty from list of Optionals
Stream.of(name, Optional.empty())
  .filter(Optional::isPresent)
  .map(Optional::get)
  .forEach(System.out::println); //Prints Hello

//Do something only if not null
name.ifPresent(System.out::println);

//Default values in case of null
int length = name.map(String::length).orElse(0);

//Throw exception in case of null
length = name.map(String::length)
  .orElseThrow(() -> new IllegalArgumentException("Can't be null"));
//Creating Optionals
val name : String? = "Hello"
//Transforming
name?.toUpperCase();
//Filter non empty from list of Optionals
println(listOf(name, null).filterNotNull()) //prints [Hello]
//Do something only if not null
name.let { println(it) }
//Default values in case of null
var length = name?.length ?: 0
//Throw exception in case of null
length = name?.length ?: throw IllegalArgumentException("Can't be null")How Kotlin ensures null safety when mixing with Java code?
Kotlin interoperates nicely with Java methods that accepts nullable objects as parameters. It does it using annotations @Nullable and @NotNull which you can import them from org.jetbrains.annotations package.
- If a method param is not annotated, Kotlin compiler can’t prevent you from passing null, so it can result in NPE if you pass null.
- If a method param is annotated with @NotNull , Kotlin compiler won’t allow you to pass null value.
- If a method param is annotated with @Nullable , Kotlin compiler will allow you to pass null value, but it could result in NPE if not handled safely.
The below example shows Java method with annotations and how it behaves when invoked from Kotlin.
// Will throw NPE since we are passing null value
// to Java parameter that is not annotated.
var result = javaMethodWithNullable(null, "hello", "world")

// Compilation error "Null can't be value for non-null type String"
// since we are passing null to Java parameter annotated as Not Null
result = javaMethodWithNullable("Hello", null, "world")

// Compiles fine as we are passing null to Java parameter annotated as Nullable.
// But will result in NPE at runtime.
result = javaMethodWithNullable("Hello", "World", null)
public static String javaMethodWithNullable(String nullableInput,
@NotNull String nonNullableAnnotatedInput ,
@Nullable String nullableAnnotatedInput){
return nullableInput.toUpperCase() +
nonNullableAnnotatedInput.toUpperCase() +
nullableAnnotatedInput.toUpperCase();
}Always use @Nullable and @NotNull annotations when calling Java code from Kotlin.
Do you really need to use nullable objects?
- You can avoid passing nullable type as method parameters by simply not invoking method if parameter value is null.
- While working with collections, you can replace nullable variables with empty collections.
- If you need to represent absence of an object. For e.g next node in Linked List or left node in tree. Instead of null references use Null Object Design Pattern
- That will leave you with only reason to use null reference is returning value from a method in case of boundary conditions and errors. Even this can be avoided by using functional style Try Monad.
Don’t use nullable types unless it is absolutely needed